Baking (Mesh Generation)
Baking converts the road layout data stored in your URoadSplineComponents into actual 3D assets placed in the
level: static meshes for the drive surface, sidewalks and curbs; spline meshes for road markings; and decals for surface
overlays.
Baking is an action of the Meta Road editor mode, not a separate tool. Open the mode, select the Bake tile in the Bake palette, and run Bake Selected or Bake All (see The Meta Road Editor Mode).
Tip
Preview before you bake. While editing you can switch the view toggle to Preview for a live, non-destructive preview of exactly what will be generated — nothing is written to disk until you bake.
Running a bake
Enter the Meta Road editor mode and open the Bake palette; click the Bake tile.
Select the road actor(s) you want to build.
Click Bake Selected (the selected
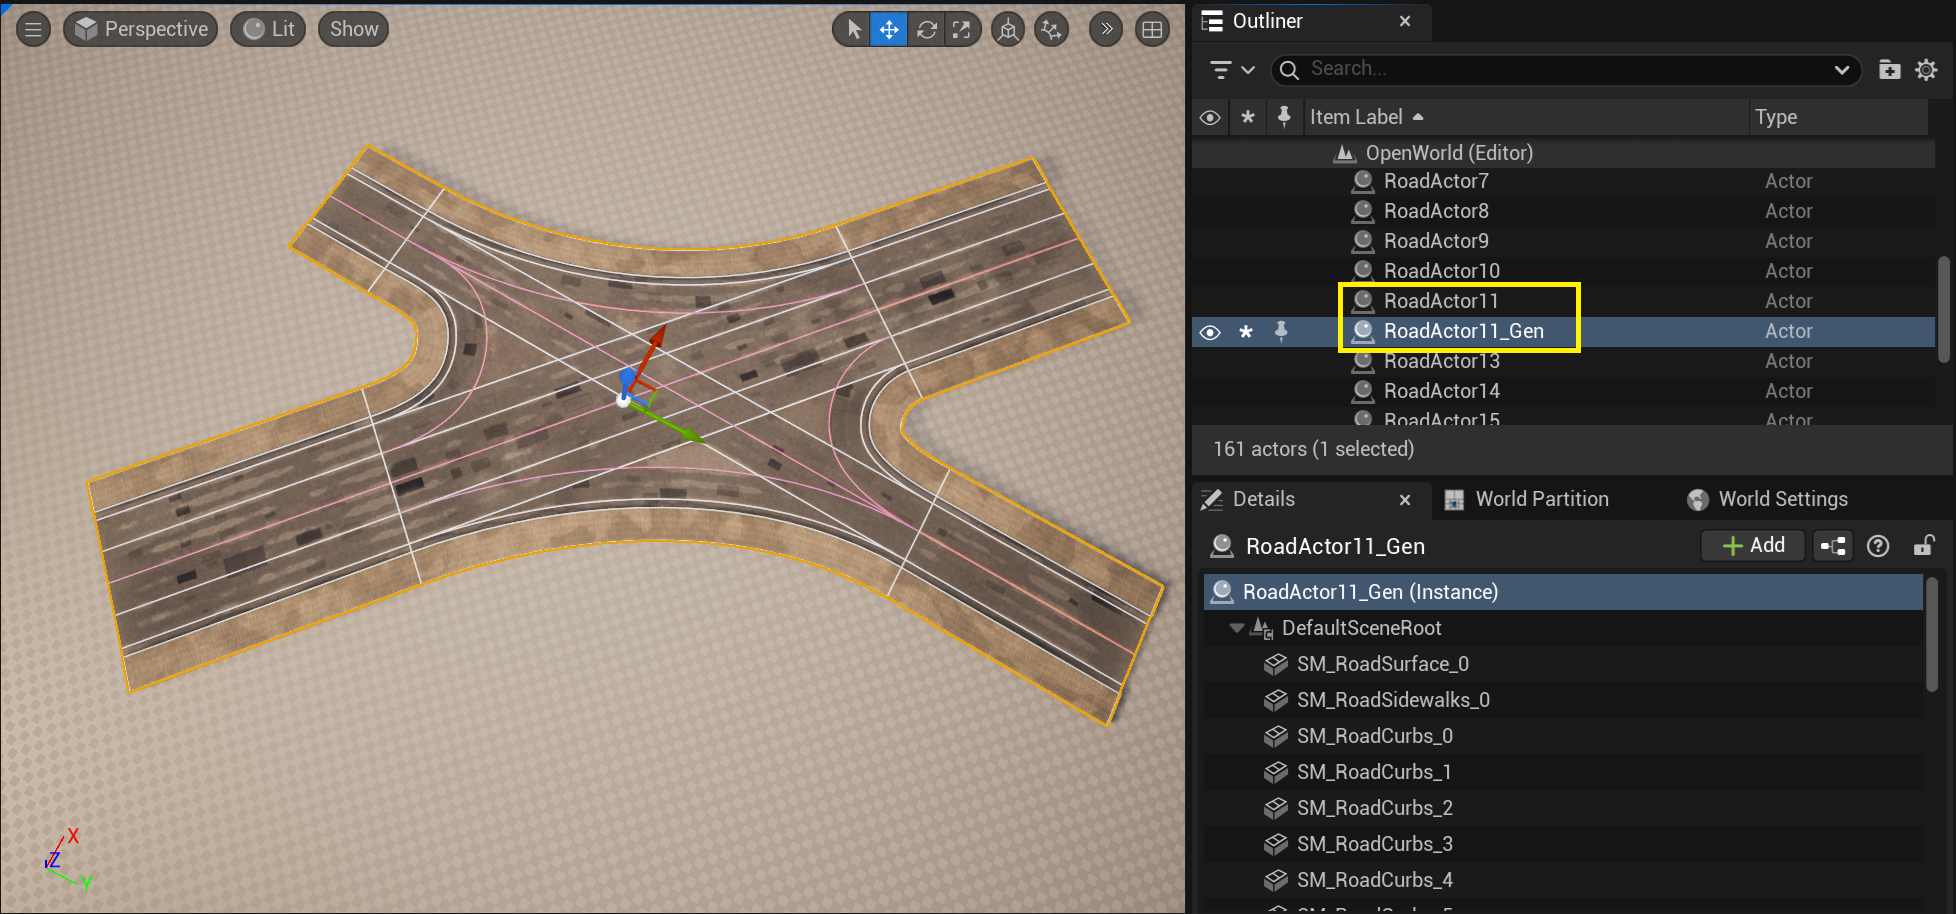
AMetaRoadactors) or Bake All (every road actor in the level).The bake runs in the background with a progress notification (with per-actor OK / warning / error counts and an Open Log button). When it finishes, a generated actor named
<YourActor>_Genis created, or the mesh is written in place, depending on the generated-asset settings.
For example, baking the actor RoadActor11 produces RoadActor11_Gen:
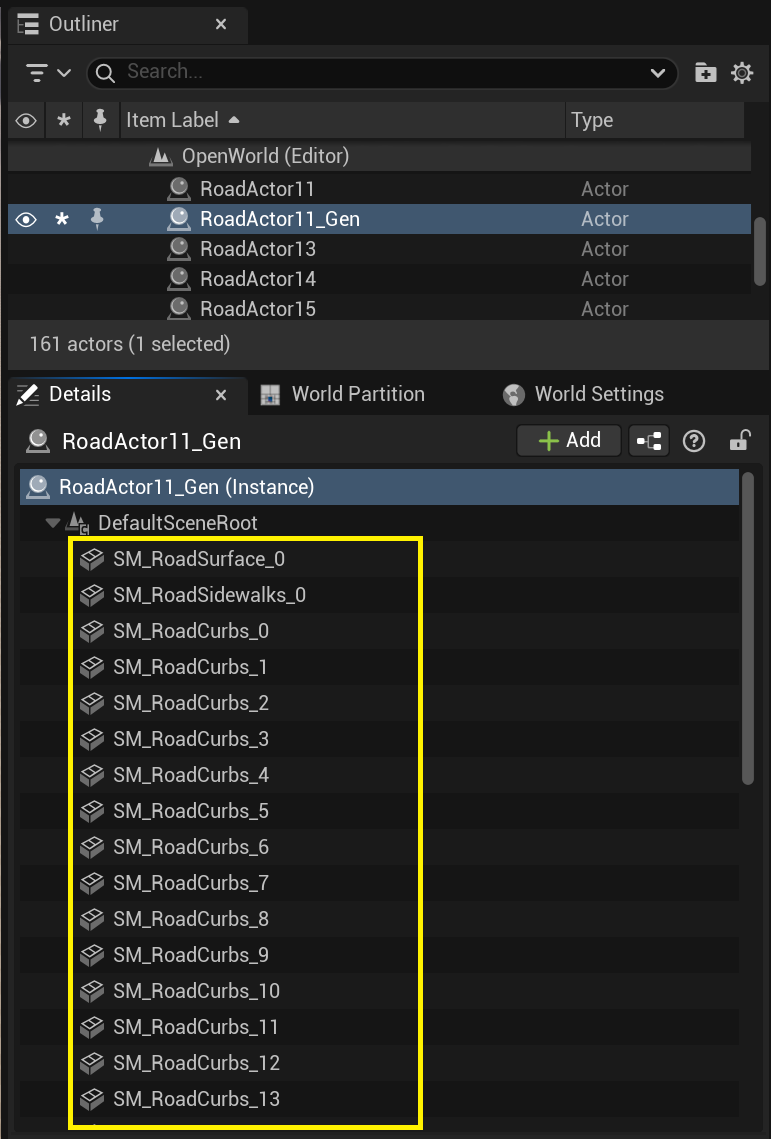
The generated actor holds the mesh components (usually UStaticMeshComponent and USplineMeshComponent) referencing
the generated assets:
Clear (on the same tile) removes the generated _Gen actors/assets without generating new ones.
Each bake generates assets for these layers:
Drive Surface + Decals
Sidewalks
Curbs
Marks
Spline Meshes (road attributes such as guardrails)
Where the settings live
Per-actor build settings (
UMetaRoadBuildSettings) — which layers to build, their materials, and triangulation parameters. Edit them per road in the Preset sub-mode (with a live preview), or from the actor’s Details panel via Meta Road → Build Settings → Edit…, which opens them in their own window. Baking always uses each actor’s committed build settings.Generated-asset settings (
UMetaRoadBakeSettings) — where the assets are written and how (see below), edited in the Bake panel.
Generated-asset settings
The Bake panel exposes a Generated Assets category (backed by UMetaRoadBakeSettings) that controls where
generated mesh assets are written, how they are saved, and what happens to the previous bake’s assets when you
re-bake. These settings live in your per-project editor preferences — a single shared instance, not stored per road
and not saved in the level — so they apply to every bake until you change them.
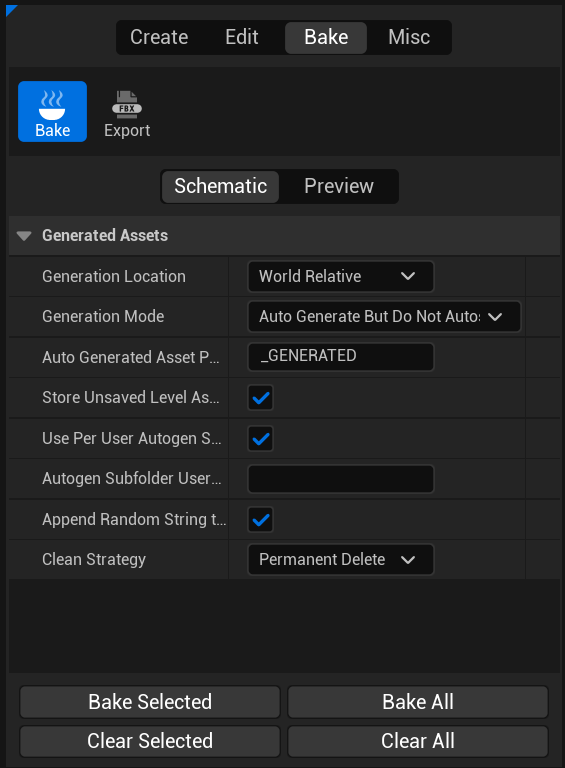
Where assets are saved — output location
Generation Location chooses the root folder generated assets go into:
Option |
Where the assets land |
|---|---|
World Relative (default) |
A folder next to the current level (the level’s own content folder) — keeps a level’s generated meshes together with the level. |
Global |
The top-level |
Current Asset Browser Path |
The folder currently selected in the Content Browser (falls back to World Relative if none is available). |
Under that root, several options shape the exact path. They are all ignored when Current Asset Browser Path is used (it writes straight into the selected folder):
Option |
Default |
Effect |
|---|---|---|
|
|
Sub-folder segment appended under the root. Leave it empty to write directly into the root. |
|
on |
Adds a per-user sub-folder under the auto-generated path, so several people baking the same level don’t overwrite each other. |
|
(OS user name) |
Custom name for that per-user sub-folder. |
|
on |
(World Relative only) For an unsaved level — whose content folder can’t be resolved — write into |
|
on |
Appends a short random suffix to each asset name so bakes never collide. |
With the defaults, baking saves meshes to something like …/<Level>/_GENERATED/<YourName>/RoadActor11_… _ab12cd.
How assets are saved — save behavior
Generation Mode decides what happens to each asset the moment it is created:
Option |
Behavior |
|---|---|
Auto Generate And Autosave |
Create the asset and immediately save it to disk. |
Auto Generate But Do Not Autosave (default) |
Create the asset and mark it dirty — it appears in the Content Browser, but you save it yourself (Ctrl+S / Save All). |
Interactive Prompt To Save |
Ask for a target folder via a save dialog. To avoid one dialog per sub-mesh, MetaRoad prompts once per bake and reuses that folder for the whole batch; cancelling aborts the bake (nothing is generated). |
Auto-cleaning previous assets
Each road actor has a Replace on Regenerate flag (AMetaRoad, default on). When it is on, re-baking that actor
first removes the previous bake’s _Gen actor and its generated mesh assets, then builds fresh ones — so re-baking
doesn’t leave orphaned meshes behind. With it off, a re-bake keeps the old output in place next to the new one. The
Clear action runs the same cleanup for the selected actors unconditionally (ignoring the flag) without generating
anything.
How the old mesh assets are disposed is set by Clean Strategy:
Option |
What it does |
Undo (Ctrl+Z) |
|---|---|---|
Permanent Delete (default) |
Permanently deletes the previous bake’s mesh assets from disk. |
Still restores the old |
Move To Trash |
Moves (renames) the old mesh assets into a |
Fully reversible: restores the old actor with valid mesh references, nothing is lost from disk, and prior undo history is preserved. |
Note
Use Move To Trash while iterating (safe and fully undoable) and Permanent Delete for clean final output. The
_Trash folder is not emptied automatically — delete it yourself once you’re happy with the result.
Spline grouping (important)
Baking forms generation units from your splines: one unit per (AMetaRoad actor, SubGroup). Splines in the same
actor and the same SubGroup are triangulated into one seamless mesh; different sub-groups/actors are generated
independently. Keep an intersection’s splines in one actor and SubGroup, and split large networks so each
junction is its own unit. This rule is explained in full — with examples — in
The MetaRoad Workflow → Spline grouping.
See also
Texturing — lane materials, the UV channels, texture density and vertex color.
Triangulation — the shared build settings every layer reads: spline sampling, surface density, the edge profile, overlap handling and smoothing.
FBX Export — export the road meshes to
.fbxfiles.Preset Mode — stage build settings against the live preview.